
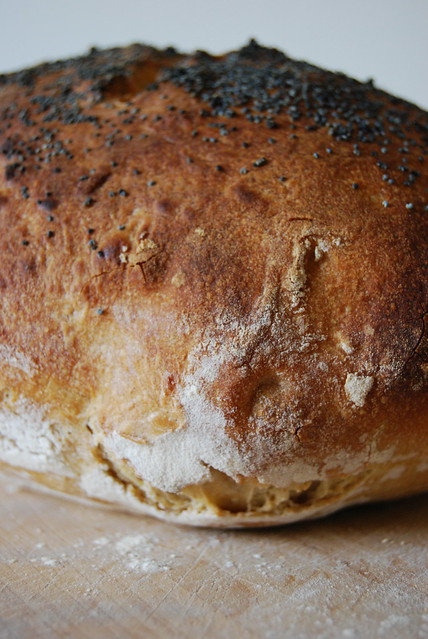
Look how gorgeous my first ever loaf made from my very own homemade sourdough base turned out! I have of course baked with sourdough before, but this feels just a little bit more special.

Recipe time! As with my previous bread baking recipes, this one also comes from Mr. Martin Johansson. I promise you it is insanely easy. (I swear!) You just have to plan ahead when you're going to bake it and have lots of free time at home. This one is especially easy because it has just a pinch of regular fresh yeast to really give the bread an extra lift, until your sourdough base is really strong.
Sourdough base recipe if you missed it...

ONE EASY WHITE SOURDOUGH LOAF:
The night before you're going to bake your bread you should kick start a little bit of your sourdough base (which has been living in your fridge.) This will insure that your bread turns out super airy and delicious. Just do the following:
In a large bowl combine:
30g wheat sourdough base
120g white bread flour
100g lukewarm water
Mix together (I use a chopstick) for about 30 seconds, cover with plastic wrap. Place in a warm place (20-25 degrees celsius) and allow to rise for 8-10 hours while you get a restful night's sleep.
The next morning add the following to yesterday's sourdough mixture in the bowl:
5g Fresh yeast (not dry)
200g cold water
300g white bread flour
6-9g salt
Mix everything together to make a sticky dough (I use a chopstick). Allow to rise for 45 minutes (I always set a timer otherwise I'll forget). After 45 minutes, wet fingers and pull one side of the dough and fold towards the middle (without punching the dough down) about 4 times around. Repeat this two more times with the same folding procedure after 45 minutes rest. After the third folding allow the dough to rise for 1 hour.
As soon as the hour has passed, preheat your oven to the hottest setting 250 degrees celsius (I like to have the oven fan turned on as well, if your oven has such a setting.) Now you can form your bread (on a piece of parchment paper with extra flour sprinkled so it doesn't stick) to the shape you'd like; round as shown, oblong, 2 baguettes, mini rolls etc. Just make sure to work it as little as possible as to not remove all the wonderful air inside the dough. Allow to rise for additional 30 - 45 minutes while the oven is heating (plus give the oven a little extra time to get really really insanely hot.)
Before you bake your bread you can make it look super professional by spraying water from a clean spray bottle (obviously) on to the surface of the bread. This acts as glue for any number of yummy extras like poppy seeds shown, or other seeds or grains etc. Spraying water also gives your bread a nice crust and a nice shine. You can also use a sharp knife to cut slits into the top. (wow! professional looking! haha)
Throw in your gorgeous looking dough into the oven. After about 10-15 minutes open the door and give your bread a few more spritzes with your spray bottle and then turn down the heat to 200 degrees celsius until finished. A loaf takes about 25-30 minutes, baguettes 15, and mini rolls about 10. They should look wonderfully dark golden and risen even more. If your bread starts taking on too much color too fast just place some foil over it until it's done.
Try to refrain from cutting into it right away. (I know it's so tempting!) Allow it too cool just a bit so you don't burn your hands and so the bread gets a chance to settle. But I'm sure there is no greater thing than a freshly baked warm piece of bread with melting butter on it. (The boyfriend and I have to seriously control ourselves, otherwise we could consume the entire loaf right away.) Yum!
I promise that there won't be more blabbering about sourdough for a while... well unless you of course like to learn more. Just email/message me with questions :)

Recipe time! As with my previous bread baking recipes, this one also comes from Mr. Martin Johansson. I promise you it is insanely easy. (I swear!) You just have to plan ahead when you're going to bake it and have lots of free time at home. This one is especially easy because it has just a pinch of regular fresh yeast to really give the bread an extra lift, until your sourdough base is really strong.
Sourdough base recipe if you missed it...
ONE EASY WHITE SOURDOUGH LOAF:
The night before you're going to bake your bread you should kick start a little bit of your sourdough base (which has been living in your fridge.) This will insure that your bread turns out super airy and delicious. Just do the following:
In a large bowl combine:
30g wheat sourdough base
120g white bread flour
100g lukewarm water
Mix together (I use a chopstick) for about 30 seconds, cover with plastic wrap. Place in a warm place (20-25 degrees celsius) and allow to rise for 8-10 hours while you get a restful night's sleep.
The next morning add the following to yesterday's sourdough mixture in the bowl:
5g Fresh yeast (not dry)
200g cold water
300g white bread flour
6-9g salt
Mix everything together to make a sticky dough (I use a chopstick). Allow to rise for 45 minutes (I always set a timer otherwise I'll forget). After 45 minutes, wet fingers and pull one side of the dough and fold towards the middle (without punching the dough down) about 4 times around. Repeat this two more times with the same folding procedure after 45 minutes rest. After the third folding allow the dough to rise for 1 hour.
As soon as the hour has passed, preheat your oven to the hottest setting 250 degrees celsius (I like to have the oven fan turned on as well, if your oven has such a setting.) Now you can form your bread (on a piece of parchment paper with extra flour sprinkled so it doesn't stick) to the shape you'd like; round as shown, oblong, 2 baguettes, mini rolls etc. Just make sure to work it as little as possible as to not remove all the wonderful air inside the dough. Allow to rise for additional 30 - 45 minutes while the oven is heating (plus give the oven a little extra time to get really really insanely hot.)
Before you bake your bread you can make it look super professional by spraying water from a clean spray bottle (obviously) on to the surface of the bread. This acts as glue for any number of yummy extras like poppy seeds shown, or other seeds or grains etc. Spraying water also gives your bread a nice crust and a nice shine. You can also use a sharp knife to cut slits into the top. (wow! professional looking! haha)
Throw in your gorgeous looking dough into the oven. After about 10-15 minutes open the door and give your bread a few more spritzes with your spray bottle and then turn down the heat to 200 degrees celsius until finished. A loaf takes about 25-30 minutes, baguettes 15, and mini rolls about 10. They should look wonderfully dark golden and risen even more. If your bread starts taking on too much color too fast just place some foil over it until it's done.
Try to refrain from cutting into it right away. (I know it's so tempting!) Allow it too cool just a bit so you don't burn your hands and so the bread gets a chance to settle. But I'm sure there is no greater thing than a freshly baked warm piece of bread with melting butter on it. (The boyfriend and I have to seriously control ourselves, otherwise we could consume the entire loaf right away.) Yum!
I promise that there won't be more blabbering about sourdough for a while... well unless you of course like to learn more. Just email/message me with questions :)
No comments:
Post a Comment